Glass Cutting - Soldering - Leading - Glass Creation/Selection - Tools
Supplies/Equipment  - Puttying - Misc
Glass Cutting:
The technique for cutting glass is very simple.
The novice needs minimal practice to develop a feel for scoring
and breaking out. However, it will help to observe certain basic
and easily understood requirements.
The primary objective in glass cutting should
not be merely to sever the sheet but to score and breakout so
that the resulting cut edges have good quality surfaces, free
of nicks and chips. A nicked or chipped edge is a weak edge and
can contribute to glass failure.
The Score Line:
A glass cutter does not and cannot cut glass in the sense of
shearing, sawing or routing. A glass cutter is a force generator.
By rolling on the surface, the cutting wheel develops a system
of forces 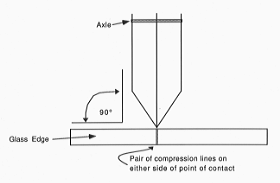 in the glass so that
a minute fracture, called a fissure, is created in the sheet.
This is really a pair of compression lines that form on either
side of the point of contact with the cutting wheel. Bending
the glass causes the glass to take the path of least resistance
between the compressed lines and split. A good quality cut edge
can be attained at break-out only if a proper fissure was made
by the wheel.
in the glass so that
a minute fracture, called a fissure, is created in the sheet.
This is really a pair of compression lines that form on either
side of the point of contact with the cutting wheel. Bending
the glass causes the glass to take the path of least resistance
between the compressed lines and split. A good quality cut edge
can be attained at break-out only if a proper fissure was made
by the wheel.
The fissure which will yield a good, clean,
and strong edge is practically invisible when the glass surface
is viewed. However, it can be seen by looking into the glass
at an angle. The good fissure will reflect light and appear as
a continuous band of light. No chips of glass dust should be
on the surface if a proper fissure is made. A white gritty line
indicates a gouge or scratch has been made, not a true fissure.
The surface of the glass has been crushed, not scored. It's possible
a piece can be broken out along a gouge or scratch but the edge
will be chipped and weak. Return to
top:
Score Lubricant:
The use of cutting oil on the score line significantly improves
the quality of the score and subsequent breakout. A "dry"
cutter should be dipped after every score. If a problem persists
in cutting glass, consider applying cutting oil directly to the
glass with a small brush. An "oil cutter" automatically
lubricates the score line as it is being made. It also has a
wheel of carbide steel and stays sharper much longer. Serious
glass workers should be using oil cutters. An oil cutter will
pay for itself in overall length of useful life, and will result
in more successful glass cutting.
Holding the Cutter:
The traditional way to hold the glass cutter is between index
and middle fingers with the thumb and index finger on the flat
spots of the cutter handle. This will be ideal for the best control
and vision. When the cutter is held in this fashion it is usually
pulled toward the operator. However it is not critical whether
it is pushed or pulled. The most convenient and comfortable grip
and direction is always best, provided the following requirements
are observed: 1) The glass surface along the line of the score
must be clean before the score is made; 2) The wheel must roll
freely and be in direct contact with the glass to develop the
proper fissure. Before attempting to score the glass it is vital
the wheel be lubricated. Return to top:
Cutting Force and Speed:
The most common error in glass cutting is TOO MUCH PRESSURE.
The force applied on the cutter is dependent on the wheel angle,
the condition of the wheel and on the type and thickness of the
glass. The maximum force which should be applied is easily defined.
It is the greatest force which can be used without crushing the
glass surface. When the score becomes a white gritty line the
maximum force necessary has been exceeded. Some practice is required
to get the feel of applying the maximum force without crushing.
It is essential to maintain this force uniformly throughout the
full length of the score. If the force varies then the depth
of the fissure will vary and affect the quality of break. When
scoring and applying the maximum non-crushing force, the score
must be continuous until the wheel runs off the edge of the glass.
The depth of fissure is directly affected
by the speed of cut. The faster the wheel rolls, the deeper will
be the fissure. There is an inverse relation between force and
speed. As the speed is increased, the force must be decreased
to avoid crushing and gouging. Generally, the faster the score
(below maximum non-crushing force), the better the cut. What
is important is that the speed be maintained uniformly throughout
the cut until the wheel drops off the edge of the glass. Never
retrace the line of cut. A score can only be made once. Retracing
only creates a gouge and damages the wheel.
Verticality of the cutting wheel must be maintained
in scoring. When the cutting wheel is tilted tot he left or right,
the angle presented to the glass changes and affects the quality
of score. Keep the wheel at right angles to the surface of the
glass. Return to top:
Summary for Scoring:
In summary, the requirements for good scoring are:
1. A good cutter.
2. A firm, flat, clean support for the glass.
3. Clean glass.
4. Cutting oil.
5. Not tilting the wheel to left or right.
6. Uniform application of force and speed, maximum non-crushing
force.
7. Always do the hardest cut first (inside curves).
8. A score clean of glass chips and barely visible when looking
at the surface of the glass.
Breakout:
The quickest and easiest method of breaking out the score is
to bend the glass, pushing up from the side of the glass opposite
the score line while giving some lateral pull. Position you hands
by curling your fingers toward yourself on the bottom side of
the glass (the backs of your fingers should be touching) and
pointing your thumbs away from yourself on the top surface of
the glass. The fleshy part of your thumbs should be touching
each other. (Think of your hands being in a "Praying"
position except your fingers are not straight but curved back
toward yourself. The glass is under your thumbs and resting on
top of your fingers.) Start the run at one end of the fissure,
running the score toward the point of the piece you wish to keep
if the score is at an angle to the edge of the glass.
A very slight angle of bending is required,
rarely more than 2 or 3 degrees. On straight cuts, as soon as
the break starts, it will rapidly run the entire length of the
score line. However, in doing a curved score the proper procedure
is to do a "controlled run". Rather than running the
entire length from the edge of the glass, a controlled run consists
of giving a very slight bend with breaking pliers trying to get
the score line to run a very short distance (1/2" or so)
then moving the pliers to the visible end of the run just created
and continuing the run another short distance until the run has
been completed from end to end. It may be necessary to hold the
glass at one end of the score line and give a slight wiggle and
lateral pull to release the glass from the score line. After
seperating the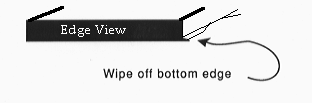 glass it's a good
idea to wipe off the bottom edge of the glass piece being saved
in order to remove the sharp edge generally left on the bottom
side of the glass. Use the other piece of glass or the cutter
or pliers you're already holding in a very shallow wiping action
coming up and away from the bottom of the glass.
glass it's a good
idea to wipe off the bottom edge of the glass piece being saved
in order to remove the sharp edge generally left on the bottom
side of the glass. Use the other piece of glass or the cutter
or pliers you're already holding in a very shallow wiping action
coming up and away from the bottom of the glass.
Other methods for breaking out the glass are:
1. Align a straight score on large sheets just inside the table
edge, lift and firmly snap the glass down.
2. Running pliers can be used on straight lines or to start slightly
curved lines. Align the top center of the pliers with the score
line and squeeze the handles.
3. Breaking pliers would be used where a controlled run is desired
and where the piece being removed is too small to grab with thumb
and fingers.
4. For inside curves multiple arcs need to be made and broken
out, leaving a thin strip to be broken out at the final score
line.
5. Tapping is used on certain scores, usually curves, as a last
resort. Hit the glass on the side opposite the score line using
the ball end of your glass cutter. It is necessary to have some
mass to the glass on each side of the score line for tapping
to work properly.
6. Grozing is the use of breaking or grozing pliers to nip the
glass away a small piece at a time. It is usually used on inside
curves or narrow strips.
7. If all else fails, there's always the grinder.
Return to top:
Pattern Cutting:
As a general rule, always do the hardest cut first. Glass tends
to run in a straight line. This means inside curves should be
done before any other cut is made. It will be most efficient
to place the pattern to be cut with the inside curve facing the
raw edge of the glass. If something goes wrong, the pattern can
be backed away and tried again, resulting in less glass and time
wasted. It is also hard to run very thin strips of glass without
getting ragged, chipped edges. Allow a 1/4" margin minimum
distance from the edge of the glass when placing the pattern
on the glass unless the edge is going to be used in its entirety.
When scoring around a paper pattern it is
necessary to steer (turn) the cutter in the proper direction.
The paper will not turn the cutter for you. By keeping the cutter
vertical you can easily twist the cutter so the wheel is pointing
and rolling in the direction you intend it to go.
Alternatives to using the paper pattern directly
as a guide in cutting glass are to outline the pattern paper
on the glass with a pen or to draw the pattern on the glass while
it overlays the drawing. You would then follow the inside edge
of the pen line with the cutter.
GOOD LUCK AND GOOD CUTTING! Return to top:
